EPFO Member Portal: Login, PF Passbook & Online Claim
The EPFO Member Portal at unifiedportal-mem.epfindia.gov.in is where you log in with your UAN to check your PF passbook, file an online claim, update KYC, and track claim status. EPFO runs three separate portals — one for members, one for the passbook, one for employers — and most people land on the wrong one first. This page tells you which link to use for which task, with verified steps for each. It also covers the 2026 changes that affect your money: the 8.25% interest rate for FY 2025-26, the new Form 121 that replaced Forms 15G and 15H, and the EPFO 3.0 framework now rolling out UPI and ATM-based PF withdrawal.
The Three EPFO Portals — Which One You Actually Need
EPFO does not have one login page. It has three, and they each serve a different person.
| Portal | URL | Who uses it | What you can do |
| Unified Member Portal | unifiedportal-mem.epfindia.gov.in | Employees | Login with UAN, file claims, update KYC, view service history, e-Nomination |
| Member Passbook Portal | passbook.epfindia.gov.in/MemberPassBook/login | Employees | Check PF balance, download passbook PDF |
| Unified Employer Portal | unifiedportal-emp.epfindia.gov.in | Employers / HR | ECR upload, challan payment, employee KYC approval, mark exit dates |
Pensioners use the same Member Portal — pension details and Digital Life Certificate options live inside the member dashboard, not a separate site.
One safety check before you log in anywhere. Any URL that does not end in epfindia.gov.in is not EPFO. EPFO never calls members asking for your OTP, Aadhaar number, password, or bank details. If anyone phones you claiming to be from EPFO and asks for money to “release your claim,” hang up and report it at epfigms.gov.in.
What is EPFO? (And the Three Schemes You Are Actually Enrolled In)
EPFO stands for the Employees’ Provident Fund Organisation, set up in 1951 under the Ministry of Labour and Employment. It runs the retirement and social security system for salaried workers in establishments with 20 or more employees, plus some smaller ones that opt in voluntarily. It is governed by the Employees’ Provident Funds and Miscellaneous Provisions Act, 1952, and operates through field offices across India under the Central Board of Trustees.
When you contribute to “PF” every month, you are actually contributing to three separate schemes:
- EPF (Employees’ Provident Fund) — your retirement savings. You contribute 12% of your basic pay plus dearness allowance. Your employer contributes a matching 12%, but only 3.67% of that lands in your EPF.
- EPS (Employees’ Pension Scheme, 1995) — your monthly pension after retirement. 8.33% of the employer’s 12% share (capped at ₹1,250 per month on the ₹15,000 wage ceiling) goes here. You become pension-eligible after 10 years of service and can draw pension from age 58.
- EDLI (Employees’ Deposit Linked Insurance Scheme, 1976) — a life cover funded entirely by the employer (0.50% of wages). Your nominee receives up to ₹7 lakh if you pass away while in service.
The 8.25% interest rate recommended by the Central Board of Trustees at its 239th meeting on 2 March 2026 applies to your EPF balance only — EPS and EDLI do not earn interest. Final crediting follows ratification by the Ministry of Finance.
Your UAN — The 12-Digit Number That Runs Everything
Your Universal Account Number is a 12-digit ID that EPFO assigns once and you keep for life. When you change jobs, your UAN stays the same — only the Member ID (your PF account number with each employer, often something like KNRPY00271810000012345) changes. Every Member ID you’ve ever had gets linked under that single UAN.
You can usually find your UAN printed on your monthly salary slip. If your slip doesn’t show it, ask your HR — they have it on record. Or retrieve it yourself in two minutes using the method below.
One thing trips up most people: having a UAN is not the same as having an active UAN. Until you activate it, you cannot log in to the Member Portal, file a claim, or download a passbook. Activation is a one-time setup — link Aadhaar and mobile, set a password — and after that the same credentials work for life.
How to Find Your UAN If You Don’t Know It
Path A — If you have your old PF Member ID from a salary slip:
- Open unifiedportal-mem.epfindia.gov.in
- Scroll down and click Know your UAN

- Enter your registered mobile number, select Proof Type ID, enter ID Proof Number, type the captcha, and click Send OTP & Verify.
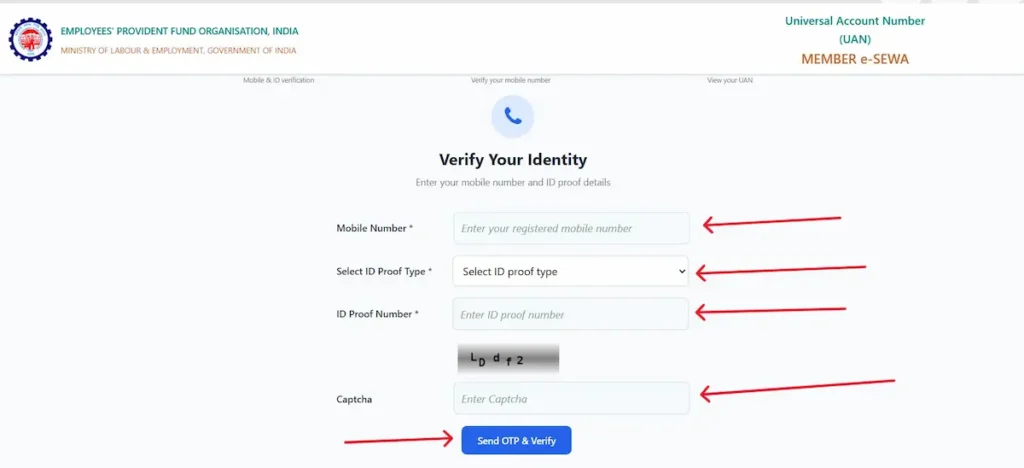
- Enter the OTP and click Validate OTP
- On the next screen, fill your name, date of birth, and choose Member ID — enter the PF number from your salary slip
- Type the captcha and click Show my UAN
- Your UAN appears on screen and is also sent by SMS
Path B — If you only have your Aadhaar or PAN: follow the same steps, but at step 5 pick Aadhaar or PAN instead of Member ID and enter that number.
Important: If two UANs show up against your name, you have a duplicate — a previous employer generated a fresh UAN instead of linking to your existing one. This is fixable, but if you ignore it, future claims will get rejected.
How to Activate Your UAN (UMANG App — Face Authentication)
Since 2024, EPFO has shifted UAN activation to Aadhaar-based Face Authentication (FAT) on the UMANG app. The older Aadhaar OTP route on the website still works for some users, but the face-auth method on UMANG is now the recommended path and is mandatory for fresh UAN generation.
- Download UMANG from Google Play or the Apple App Store
- Register using your Aadhaar-linked mobile number and set a 4-digit M-PIN
- Inside UMANG, search EPFO and open UAN Services Through Face Auth
- Tap UAN Activation
- Enter your 12-digit UAN, Aadhaar number, and Aadhaar-linked mobile number, then click Send OTP
- Enter the OTP and submit
- Complete the live face scan — well-lit room, plain background, look straight at the camera
- A temporary password is sent to your mobile by SMS
Note: The activation password is what you’ll use on the Member Portal website. Your UMANG M-PIN is separate and only opens the app.
How to Log In to the EPFO Member Portal
You need three things on hand: your 12-digit UAN, the password you set during activation, and your Aadhaar-linked mobile number for the OTP.
- Open unifiedportal-mem.epfindia.gov.in
- Enter your UAN in the first field
- Enter your password
- Type the captcha shown on screen
- Click Sign In
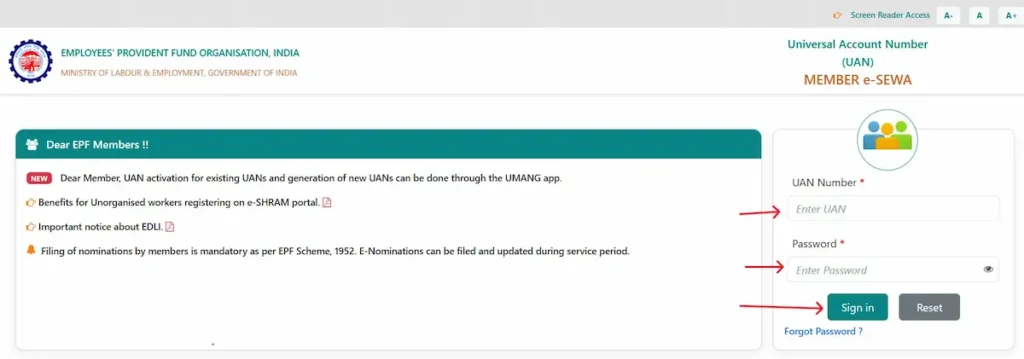
- Request and enter the 6-digit Aadhaar OTP sent to your registered mobile
- You land on your member dashboard
Quick tip: EPFO server load peaks between the 15th and 20th of every month, when most employers file their ECR returns. If the OTP doesn’t arrive or the page hangs, wait 30 minutes and try again — or use the UMANG app, which usually loads faster during peak hours.
What You Can Do After You Log In
View total PF balance and download the passbook · Check your service history (every employer linked to your UAN) · Update KYC (Aadhaar, PAN, bank account) · File or track a claim · Submit a PF transfer request when changing jobs · File or update e-Nomination · Download your UAN card · Reset password or change mobile number.
EPFO Member Passbook — Check PF Balance and Download PDF
The Member Passbook lives on a separate URL from the main portal — same UAN and password, different login page.
To view your passbook:
- Open passbook.epfindia.gov.in/MemberPassBook/login
- Enter your UAN, password, and captcha
- Click Login — you’ll see a list of Member IDs (one per employer)
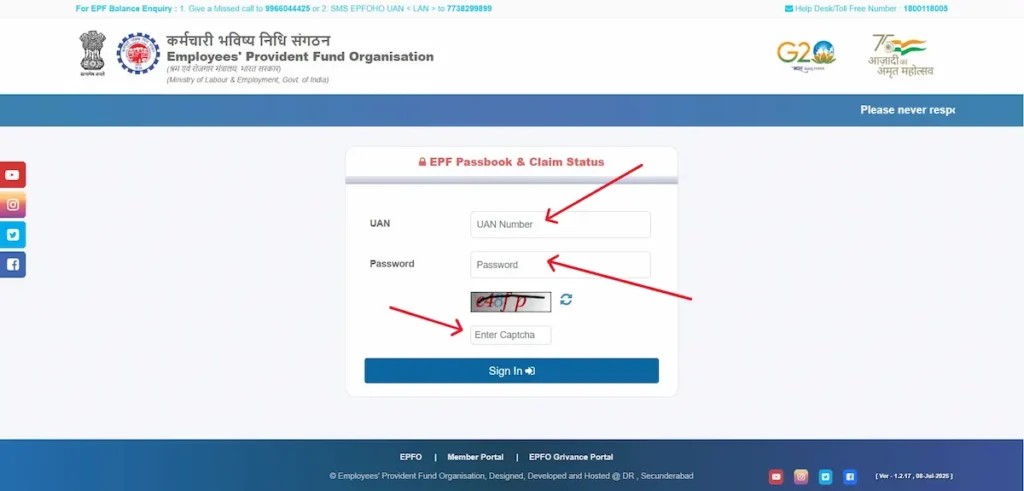
- Click View Passbook against the Member ID you want to check
To download the PDF: on the open passbook view, click the Download PDF button at the top right.
What the Columns in Your Passbook Mean
- Wage Month — the salary month the contribution was deposited for
- Employee Share — 12% of your basic + DA that came out of your salary
- Employer Share (EPF) — 3.67% of basic + DA from your employer, into your EPF
- Pension Contribution (EPS) — 8.33% from your employer into the pension scheme (this is tracked separately and is not part of your withdrawable PF)
- Interest — credited once a year, calculated on your monthly running balance
Your total PF balance at the bottom is Employee Share + Employer Share (EPF) + Interest. The EPS amount is shown for transparency but isn’t withdrawable as PF.
Three Other Ways to Check PF Balance (No Login Needed)
- Missed call: Give a missed call from your UAN-registered mobile to 9966044425. The call disconnects after two rings and you get an SMS with your balance.
- SMS: Send EPFOHO UAN ENG to 7738299899. Replace ENG with HIN, TAM, TEL, MAR, BEN, KAN, MAL, GUJ, or PUN for that language.
- UMANG app: Open UMANG, search EPFO, tap View Passbook under Employee Centric Services, log in with UAN and OTP.
All four methods require your UAN to be active with the correct mobile number seeded. If your number has changed and you haven’t updated it, fix the mobile number first using the Forgot Password flow.
How to Withdraw PF Online — Forms 19, 31, 10C Explained Simply
The single biggest reason PF claims get rejected is filing the wrong form. Match your situation to this table first:
| Form | Use it when | What you get |
| Form 19 | You’ve left your job and need final PF settlement | Your full EPF balance + interest |
| Form 31 | You’re still employed and need a partial withdrawal (medical, marriage, housing, education) | Advance against your EPF |
| Form 10C | You’ve left your job with less than 10 years of service | EPS withdrawal benefit or a Scheme Certificate |
| Form 10D | You’re 58 or older with at least 10 years of service | Monthly pension |
Before you file, check your KYC: Aadhaar linked to UAN and verified by UIDAI, PAN linked (without it, TDS is 30% instead of 10%), bank account number and IFSC correctly seeded and verified, registered mobile active.
To file a withdrawal claim:
- Log in at unifiedportal-mem.epfindia.gov.in
- Top menu: Online Services → Claim (Form-31, 19, 10C & 10D)
- Verify your bank account by entering the last four digits — click Verify, then Yes on the certificate of undertaking
- Click Proceed for Online Claim
- Under I want to apply for, choose the right form
- Fill the reason, amount, and address; upload documents only if the system asks
- Tick the disclaimer, enter the Aadhaar OTP, click Submit
- Note the claim reference number — you’ll need it to track status
If your KYC is complete and Aadhaar-linked, most claims settle in 3 to 5 working days. Under the 2026 auto-settlement rules, eligible claims up to ₹5 lakh can clear in hours.
Form 121 — What Replaced Forms 15G and 15H From April 2026
Before April 2026, members under 60 used Form 15G and senior citizens used Form 15H to declare that their total income was below the taxable limit and request EPFO not to deduct TDS on early PF withdrawals. Under the Income Tax Act, 2025, both forms have been merged into a single Form 121 — a unified self-declaration that applies to every age group. Field 5a inside the form captures whether you’re below or above 60.
Form 121 only stops TDS at the source — your final tax liability is still calculated on your total annual income.
Use Form 121 when: you’re withdrawing PF before completing 5 years of continuous service, the amount is more than ₹50,000, and your total annual income is below the taxable limit.
EPFO 3.0 — UPI and ATM PF Withdrawal Rules for 2026
EPFO 3.0 is the digital overhaul approved by the Central Board of Trustees at its 238th meeting on 13 October 2025. Some pieces are already live — the ₹5 lakh auto-settlement limit, removal of employer attestation for most claims, the merger of 13 withdrawal categories into three. The headline features — UPI-based withdrawal and dedicated PF ATM cards — are expected to launch by late May 2026 and are still awaiting final operational guidelines from the Labour Ministry as of this writing.
The framework, as approved:
- UPI withdrawal cap: up to 75% of your eligible PF balance
- ATM withdrawal cap: up to 50% of your eligible PF balance
- Mandatory retention: at least 25% of your total PF corpus must stay in the account during service
- Auto-settlement limit: raised from ₹1 lakh to ₹5 lakh — most claims now process without manual review
- Employer attestation: removed for most claims; Aadhaar OTP plus self-certification is enough
- Withdrawal categories: reduced from 13 to 3 — Essential Needs, Housing, Special Circumstances
What to do now to be ready: make sure your UAN is Aadhaar-linked, PAN-linked, and your bank account is correctly seeded and verified. Members without complete KYC will not be eligible for UPI or ATM withdrawals when they go live.
One honest caveat: a PF-linked card carries the same skimming, phishing, and PIN-theft risks as a regular debit card. Treat it with the same caution — never share the PIN, cover the keypad at ATMs, and report loss immediately.
How to Track Your EPFO Claim Status
Three ways to check, in order of detail:
On the Member Portal (most detailed):
- Log in at unifiedportal-mem.epfindia.gov.in
- Top menu: Online Services → Track Claim Status
- The screen shows your claim type, reference ID, date filed, current stage, and any remarks from the field office
On UMANG: open UMANG, choose EPFO → Employee Centric Services → Track Claim. Enter UAN, complete OTP, view status.
Without login (basic check):
- Open epfindia.gov.in
- Click Services in the top menu
- Select For Employees
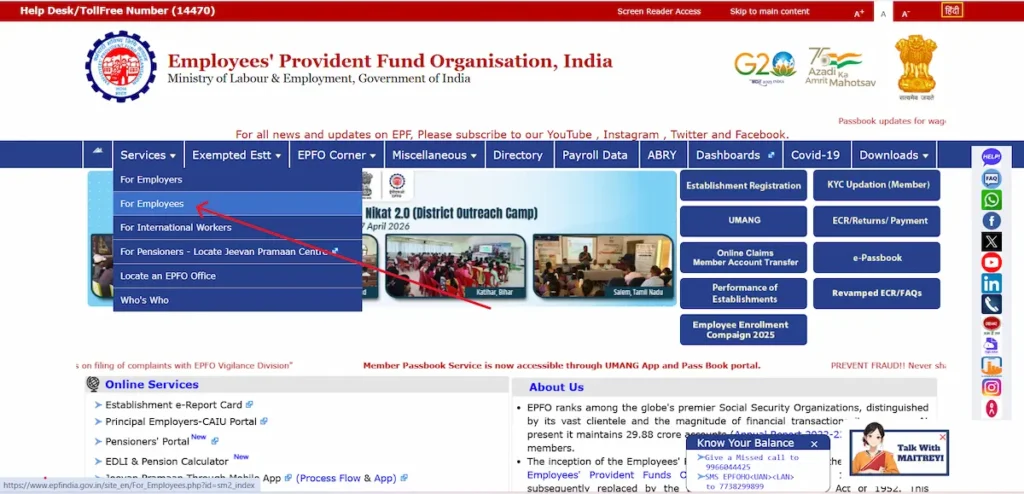
- Click Know your Claim Status
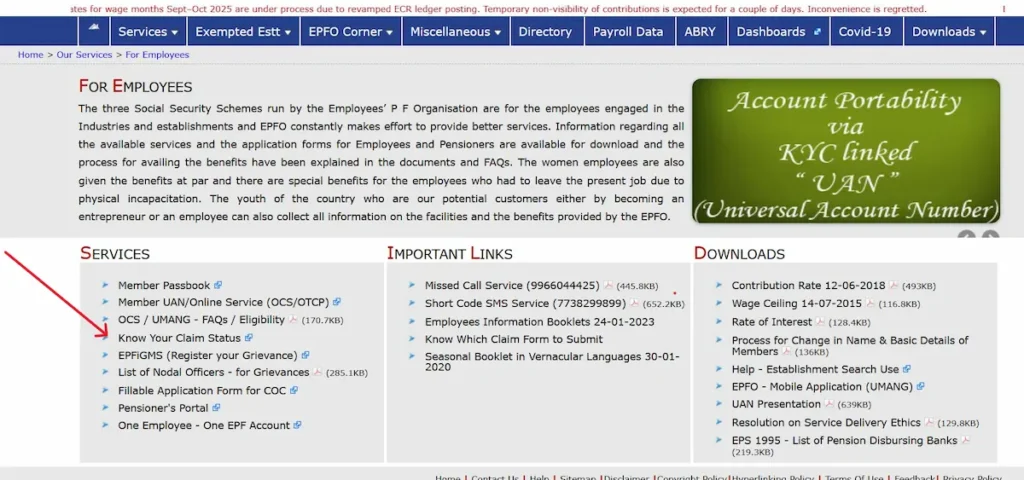
- Enter your UAN, password and captcha to view
Less detail than the Member Portal method, but works if you don’t have your password handy.
What Each Claim Status Actually Means
- Claim Form is under process — submitted and queued at your field office
- Claim Form approved — passed verification, EFT released, waiting for bank credit
- Settled / Payment under process / Available — money has been released; expect credit in 1 to 3 working days
- Rejected — the field office found an issue; see the next section for how to fix it
- Returned — minor error, usually a KYC mismatch; correct the details and resubmit
PF Claim Rejected? Fix It in 4 Steps
A rejection does not mean you’ve lost your money. It means EPFO needs a correction before it can release the amount. Roughly one in four PF claims is rejected each year, and almost all of them are fixable.
The four most common rejection reasons and how to handle each:
- 1. Name, date of birth, or father’s name mismatch with Aadhaar. Download the Joint Declaration Form from epfindia.gov.in, fill it with your correct details, get it signed by your current employer, and submit it at your regional EPFO office along with self-attested copies of Aadhaar, PAN, and a recent payslip. Once EPFO updates the record, resubmit the claim online.
- 2. Bank account, PAN, or KYC mismatch. Log in to the Member Portal, go to Manage then KYC, upload the corrected document, save it, and wait for your employer to digitally approve it. Approval usually takes 1 to 3 working days. After approval, refile the claim.
- 3. Date of Exit not updated. Your previous employer is supposed to mark your exit in the monthly ECR. When they don’t, your claim is read as “still in service” and gets rejected. You can self-update the exit date after two months from your last contribution: log in, open Manage, click Mark Exit, pick the relevant Member ID, enter the actual last working date and reason for leaving, and submit with the Aadhaar OTP.
- 4. Insufficient service or EPS contribution gap. File a grievance on epfigms.gov.in with payslips, appointment letters, and the rejection screenshot attached. The field office is required to reconcile the contribution record once you’ve provided proof.
If your grievance has been pending more than 15 days, send a reminder on EPFiGMS, email your Regional PF Commissioner (addresses are listed under Contact Us on epfindia.gov.in), or file an RTI under the Right to Information Act, 2005, which triggers a 30-day legal response window.
How to Update KYC, Mobile Number, Nominee and Other Details
Quick reference for the four updates members search for most.
Update Aadhaar, PAN, or bank account. Log in to the Member Portal, open Manage, click KYC, tick the document type, enter the details, click Save, then wait for your employer to digitally approve the request — usually 1 to 3 working days. The status changes from Pending to Approved on the same screen.
File or update e-Nomination. Log in, open Manage, click e-Nomination, add your family details, add the nominee or nominees, declare the share percentage for each, accept the declaration, and submit with the Aadhaar OTP. Without an active e-Nomination, your family will face long delays claiming PF, pension, and the EDLI insurance amount after your death. File it once and update only when your family situation changes.
Update your mobile number. On the Member Portal login page, click Forgot Password, enter your UAN, click Get Authorisation PIN on different number, enter the new mobile, verify with the Aadhaar OTP, and the new number is saved.
Mark your Date of Exit. Log in, open Manage, click Mark Exit, pick the previous Member ID, enter the date and reason for leaving, and submit with the OTP. Wait at least two months after your last salary credit before doing this yourself — earlier than that, the option will not appear.
PF Transfer When You Change Jobs (And What to Do With Multiple UANs)
If your UAN stayed the same across jobs, the transfer is straightforward.
Standard PF transfer. Log in to unifiedportal-mem.epfindia.gov.in, open Online Services, click One Member – One EPF Account (Transfer Request). Verify your personal details, choose whether your previous or current employer will attest the transfer, enter the previous Member ID, get the OTP on your registered mobile, and submit. Track the request under Track Claim Status using the tracking ID shown after submission.
If two UANs are linked to your name. This happens when a new employer issued a fresh UAN instead of linking to your existing one, usually because the previous employer didn’t update the date of exit on time. To fix it:
- Identify both UANs (both appear when you retrieve UAN using your Aadhaar number)
- Decide which UAN to keep — generally the one with current contributions
- Email uanepf@epfindia.gov.in with both UAN numbers, your Aadhaar number, and a clear request to merge
- After verification, EPFO blocks the duplicate UAN and consolidates the records under the active one
- Once the merger is confirmed by SMS, file a standard transfer request to move the old balance into the active account
UMANG App — When to Use It Instead of the Website
UMANG is the Government of India’s unified mobile application, and EPFO services run inside it. For most members, the Member Portal handles everything. UMANG becomes the better choice for tasks EPFO has now moved off the website entirely — specifically face-authentication based UAN activation.
| Use UMANG for | Use the Member Portal for |
| UAN activation through Face Authentication | Filing claims with document upload |
| Quick PF balance check on mobile | Detailed KYC document upload |
| Submitting Digital Life Certificate (pensioners) | Service history and dashboard review |
| Tracking claim status on the go | PF transfer requests and e-Nomination |
Both use the same UAN and password. There is no separate UMANG account for EPFO.
Employer Login — Quick Reference for HR and Payroll Teams
The Employer Portal is for establishments registered under the EPF and MP Act, 1952. HR and payroll teams use it to file the monthly Electronic Challan-cum-Return (ECR), pay the challan, approve employee KYC requests, and mark exit dates. Monthly PF contributions must be deposited by the 15th of the following month — late payment attracts interest under Section 7Q and damages under Section 14B of the Act.
To log in:
- Open unifiedportal-emp.epfindia.gov.in
- Enter the Establishment ID, password, and captcha
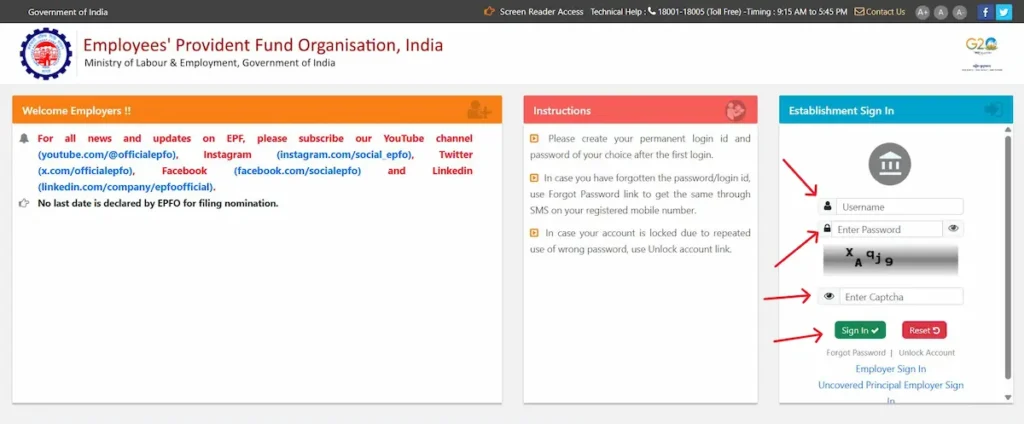
- Complete the OTP-based two-factor authentication on the registered mobile (mandatory since 2025)
How to Raise a Grievance With EPFO
If the portal can’t fix your issue, EPFO has a formal grievance system that the field offices are required to act on within a fixed window.
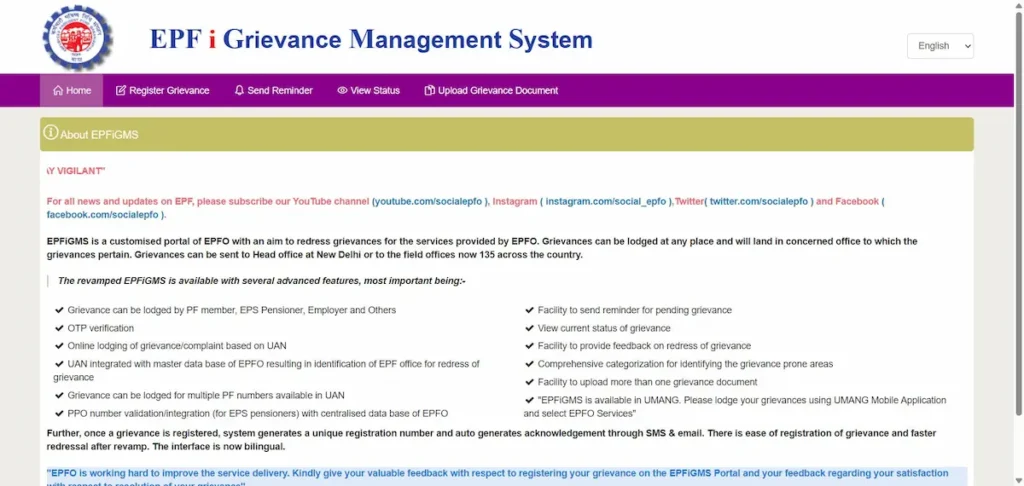
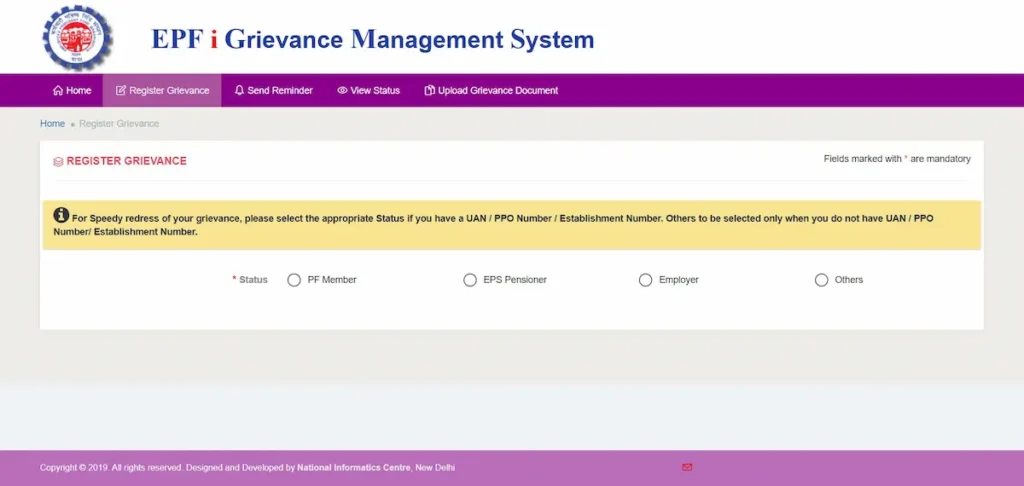
Step 1: File on EPFiGMS. Open epfigms.gov.in, click Register Grievance, choose your status (PF Member, Pensioner, Employer, or Other), enter your UAN, describe the issue with claim ID, dates, and any rejection remarks, attach supporting documents (rejection screenshot, payslips, identity proof), and submit. You’ll receive a registration number on screen and by SMS — keep it for tracking.
Step 2: If not resolved in 15 to 30 days. Use the Send Reminder option inside the same grievance on EPFiGMS. Email your Regional PF Commissioner directly — full address list is at epfindia.gov.in under Contact Us. As a final step, file an RTI under the Right to Information Act, 2005 — RTIs require a written response within 30 days.
EPFO helpline: call 14470 (toll-free, 7 AM to 9 PM, multilingual). The older UAN-specific line 1800-118-005 also remains active during government working hours.